Tuesday, October 24, 2017

Chicago Style Poutine! Giardiniera Provolone Poutine With Italian Beef Gravy | A Chicago Johnny Recipe

Chicago Poutine Recipe

Chicago Style Poutine
Chicago Johnny Poutine
A few weeks ago I showed you how to make "Smoked Italian Beef" sandwiches, today we make the popular dish, "Poutine," but we make it Chicago Johnny style. We will start with a simple twist on the traditional Poutine by adding Chicago Johnny's Italian Beef Gravy Seasoning & then the more complex, deeper flavored, & Chicago style Poutine. 

beef gravy curds

To make a basic Chicago Poutine start with :

• Cheddar Cheese Curds 
• A Basic Tempura Batter
     (lightly beat one egg, then lightly beat together with the following:        3/4 cup corn or potato starch, 1/4 cup flour, 1 tea baking powder,          1/2 tea sea salt, 1/2 tea black pepper, 1/2 cup ice water) *Make              sure you only lightly beat all ingredients together. 
• french fries
• 3 Tbl Chicago Johnny's Italian Beef Gravy Seasoning
• 2 or 3 ("tree") slices Italian Beef, shredded
• 1 Cup Warm Water
• 1 Tbl Corn Or Potato Starch
• Frying Oil Heated To 370 Degrees

chicagos best poutineFry or oven cook your French fries, then batter & fry your cheddar cheese curds. While your oil is heating or during frying (depending on your skill level), mix your corn or potato starch with your water, add your Chicago Johnny's Italian Beef Gravy Seasoning, then heat up slowly on stovetop until rich & thick. Compile your dish with fries, fried cheese curds, & then liberally drizzle with your gravy. 

A simple & absolutely delicious basic Chicago Poutine recipe!

best Chicago poutineTo make a deluxe, Chicago Johnny Poutine Recipe you will use provolone cheese, cut into about 1/2-3/4" cubes, batted, then fried. Place on top of waffle fries (fried preferably for the nice crisp contrast to the melted oozy cheese, but baked works as well), your Italian Beef shreds, & then pour your Italian Beef Gravy over top. Finally a nice helping of Chicago Johnny's Hot Giardiniera over top. Eat with a fork & a friend! This recipe is a bit of a workout, but it is #ChicagoFrigginDelicious! 


Don't forget that you can order all of Chicago Johnny's products at www.ChicagoJohnnys.com!


Monday, October 16, 2017

Scratch Made Marshmallows & S'mores | DIY Marshmallow & Graham Crackers | Smores From Scratch

Marshmallows & Graham Crackers From Scratch | DIY Smore's

scratch made graham crackers

Years ago I made my own marshmallows, chocolate, & graham crackers so I could truly understand what would normally be a simplistic s'more sandwich. The graham crackers were simple, the marshmallows took a little work & some special ingredients  I normally wouldn't have on me, & the chocolate, the chocolate was just too much frustration & I ended up burning out the motor on my coffee grinder making chocolate from cacao beans. So if you are going to ever make s'mores, truly from scratch, I would recommend skipping the chocolate process!

So start with a quality mixer! I love my KitchenAid mixer & I use the sh*t out of it! You can get a good deal around Black Friday, but if you can't wait you can get this one on Amazon at a good deal.You can also use a quality hand mixer for the marshmallows & a food processor for the graham cracker dough. You can tell I'm a KitchenAid fan.


scratch made s'more
scratch made s'more

Here's my recipe for the graham crackers:

• 1 1/2 cup whole wheat flour
• 3 Tbl cane sugar
• 1 1/2 Tbl molasses
• 1/2 teaspoon cinnamon
• 1/4 teaspoon sea salt
• 4 1/2 Tbl whole milk
• 4 1/2 Tbl butter
• 1/2 tea aluminum free baking powder
• 1/2 teaspoon baking soda

In a mixing bowl add the flour, baking soda, baking powder, cinnamon, sea salt, sugar, cold cubed butter. Beat on low until mix comes together like coarse corn meal. Add molasses, milk, & vanilla & beat on low until you form a dough.

Roll dough out in between two pieces of wax paper until about the size of your cookie sheet. Peel off the top layer of wax paper & flip your bottom layer onto the a greased cookie sheet. Flatten & spread your dough evenly across your cookie sheet. Cut your dough into about 2” x 4” rectangles. Poke each cracker with a fork about 8 times.

Bake your graham crackers at 350 degrees about 12 minutes or until the edges turn brown &
crisp & pull away from the sides.

If you haven't yet invested in quality baking sheets, I suggest these.


For the marshmallows you will need:

• Pinch of sea salt
• 3/4 cup powdered sugar
• 3 1/2 packets unflavored gelatin
• 1 tea vanilla extract (not vanillin)
• 1/2 cup honey
• 1/2 cup hot water
• 1/2 cup water

Mix together the hot water & gelatin & set aside for 5 minutes. In a medium saucepan add your remaining ingredients & bring up to 240 degrees, be careful not to get the mix on your skin! Hot sugar is not easy to get off of your skin & WILL burn you badly.

Add your sugar mix to your hot water & gelatin & beat together with a whisk attachment on a mixer. After 5-6 minutes (when your marshmallows start to turn white) turn your whisk up to medium speed. Continue to whip your marshmallows until they about double in size. Your marshmallow mix should be whipped to stiff peaks, but not translucent! If your marshmallows are shiny/translucent
looking, you have whipped them too much!

Grease a 9” x 9” cake tin & coat in powdered sugar. Press or pour your marshmallow mix into tin to cool & stiffen. When your marshmallows have stiffened, cut them up.

Make your sandwich with graham cracker, toasted marshmallow, chocolate, then another graham cracker!

I have used many variations on s'mores, but my favorites are:


A: Graham Cracker, Caramel Sauce, Sliced & Cinnamon Sauteed Apple, Toasted Marshmallow, Crushed Toasted Pecans, & Another Graham Cracker.

B: Graham Cracker, Chocolate Sauce, Toasted Coconut, Toasted Marshmallow, Toasted Coconut, Walnuts, Chocolate Sauce, Graham Cracker.

C: Graham Cracker, Melted Chocolate Chips, Toasted Pecans, Toasted Marshmallows, Almond Butter, Graham Cracker.

Enjoy this old school video of me making some of my first scratch made s'mores!

- Johnny
www.ChicagoJohnnys.com


Scratch Made Rosette Cookies | Christmas Cookies | Scandinavian Cookies | Fried Cookies

Scandinavian Fried Rosette Cookies | A Chicago Johnny's Tradition

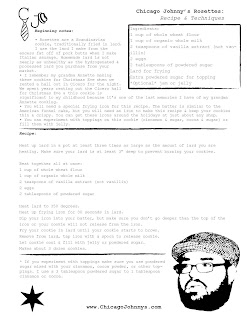
I'm not entirely sure on how these Scandinavian cookies became popular in the Chicago Italian culture, but I'm guessing it's something as simple as small Italian grocers carrying the irons to make these cookies, thus inspiring people to make them. In our family we make them every Christmas Eve. These delicious, crispy, fried cookies are easy as easy can be to make! You just need a special iron for making these Rosettes.

I was introduced to Rosettes by my grandmother's side of the family. In fact, I remember my grandmother making these when I was a young boy for our annual Christmas Eve party in Chicago. When my grandma Annette passed I was young, but certain things she had done during my childhood stuck with me to this day. These Rosette cookies are one of my childhood memories & I think about them every year around Christmas time. 

To make Rosette cookies you need very few ingredients & a specialty iron. For ingredients you will need:
rosette cookies
Rosette Cookies
• 1 cup whole wheat flour
• 1 cup whole milk (you can substitute with almond or coconut)
• 2 tea vanilla extract
• 2 eggs
• 2 Tbl powdered sugar plus more for dusting finished cookies
• Lard for frying (my preferred method, but you can use canola or vegetable or coconut)
• Optional jam for filling

In our family we make our own hot Italian sausage, so I render the fat to make lard & then use the lard to fry my Rosettes. You can use store bought lard or even oil if you have it to fry your Rosettes. 

Make sure your oil or lard is at least 3" deep to avoid burning your Rosettes. Heat up your oil to 350 degrees.

While your oil is heating up, whisk together all of your ingredients. Set out a wire rack to cool your cookies & for dusting your cookies with powdered sugar. This recipe will make about 3 dozen cookies. 

To make your Rosette cookies, heat up your iron in the hot oil for about 30 seconds for the first cookie, then it only takes about 10 seconds for the rest. Take your hot iron & dip into your cookie batter, careful not to cover the top of the iron or your cookies may not come off of the iron easily. After you dip your iron in the batter, immediately dip your iron into the frying oil for about 8 seconds or until golden brown color. Take your iron out of the oil & tap your iron with a spoon or knife to release the cookie onto your wire rack. Repeat the process until you run out of batter or there is too much oil in the batter to make more cookies (each time you dip the iron into the batter a small amount of oil will be released into the batter, eventually the batter can become too oily & will no longer work to make cookies). 

Once your cookies cool, fill with jam if you choose this option, or flip over so the solid shape is face up. Then dust with powdered sugar. If your cookies are not cooled the powdered sugar will just melt & turn into kind of an icing. 

That's it. Cookies will hold up about 2 days before they get soggy, but are edible up to two weeks later.

- Johnny
www.ChicagoJohnnys.com

Rosette Cookie Recipe

Emo & Pop Punk Hot Sauce | Dark Matter Hot Sauce | Andrew McMahon | Jake Miller | Mayday Parade | State Champs | Joie De Vivre

Andrew McMahon | Mayday Parade | State Champs | Jake Miller | Joie De Vivre | Emo & Pop Punk Hot Sauce!

Andrew McMahon Zac Clark Hot Sauce
Andrew McMahon | Zac Clark Signing

Have you ever thought about bottling those Emo tears & giving them to charity? Well, we've kind of done that! Dark Matter Hot Sauce is a brand that hand makes hot sauces with limited edition artists' labels for charity. So far on the market are Andrew McMahon, Mayday Parade, State Champs, Joie De Vivre, & Jake Miller with limited edition bottles of only 1,111 sold to the public. But wait, there's more! There is charity involved!
Pop Punk Hot Sauce
Pop Punk Hot Sauce


The idea started in 2014 when I put Andrew McMahon's face on a label just for kicks. I got him the bottle with his face on it & was inundated with requests from his fans that wanted to buy the Andrew McMahon hot sauce. As an old school guy, I didn't want to make a quick buck on the image of Andrew McMahon, but as time went on I learned more & more about the Dear Jack Foundation (www.DearJackFoundation.org) & I friggin' love it! An organization with incredibly low overhead & that helps those individuals that really need it. So I came up with the idea that 30% of each sale go to the foundation & the rest of the money cover costs. So that's how www.DarkMatterHotSauce.com came about, as a fundraising effort on my part for an organization that actually does good instead of just making money.
Dark Matter Hot Sauce

So Andrew McMahon's "Swim" 5 oz bottle & "I Woke Up In A Car" 10 oz bottle were our initial launches. Shortly thereafter was Joie De Vivre's "Maybe People Do Change." We got Mayday Parade on board with "Without The Bitter The Sweet Isn't As Sweet" & followed up with State Champ's "Slow Burn." Jake Miller was our latest release with "I Can't Help My Sauce" & we've raised over $1,500 so far for the Dear Jack Foundation! When I mentioned 30% of the sale goes to the foundation, that's what I meant; 30% of the sale, not the profit, 30% straight off the top!

Andrew McMahon Hot Sauce

Each limited edition hot sauce bottle comes wonderfully packaged & wrapped with a numbered & signed certificate of authenticity. Each label is numbered sequentially in order of the sale. We even have signed labels from most artists that are randomly sent with orders! Andrew McMahon & Zac Clark signed some rubber ducks for special orders too. 

Keep up to date with new artist labels & an upcoming extremely limited edition "Konstantine" label coming out soon! Follow us on Twitter @DMHotSauce & Instagram @DarkMatterHotSauce & Facebook

Friday, October 13, 2017

Kitchenaid Mixer Versus Sunbeam | Kitchen Aid Mixer Vs Other Mixer

So I recently started using a light weight mixer to shoot cooking videos in the studio. Only being used to a traditional Kitchen Aid mixer I was curious what the pros & cons were of this Sunbeam brand mixer. Without getting too lengthy in words, this is what I've found.


Using the Sunbeam mixer is most certainly not as high intensity as the KitchenAid. By far the KitchenAid has a superior whipping & dough kneading capacity. By far. For projects like make pizza dough, bread dough, or heavy yeast doughs, the KitchenAid wins, hands down.

When it comes to whipping (i.e. making marshmallows, whipped cream, egg whites, et cetera) the KitchenAid is superior in the sense that it will whip much smaller amounts. With the Sunbeam mixer I've found I need at least 2.5 cups of liquid to whip something where the KitchenAid will whip anything even as small as .5 a cup. The same goes for a hand mixer, whipping even the smallest amount is best with a hand mixer or a KitchenAid mixer.

Which brings me to my next thought, how often do you use a mixer? I am so used to making food in copious amounts for me, my friends, my family, & for catering. I forgot what it was like to make something in a small batch, & when I switched over to the Sunbeam my timing was off. I started shooting cooking videos making small batches of food, while the KitchenAid would have been best for these projects, I brought the Sunbeam because it was lightweight. The KitchenAid is very heavy in comparison. While at home the KitchenAid is great because it sits on the counter & I can use it about 4 or 5 times a week without an issue. However, if you are not using a mixer as often as I do you will probably keep it in a cabinet or closet somewhere. Moving the KitchenAid can be a b*&$h. The Sunbeam is incredibly easy to move, lift, travel with, et cetera. I do not recommend using a KitchenAid if you can not keep it on the counter.

Attachments were my last thought. The Sunbeam comes with two dough hooks & two traditional whip attachments (the same kind you would see on a hand mixer). The dough hooks of the Sunbeam are not nearly as heavy duty as the dough hook of the KitchenAid & the Sunbeam does not knead nearly as well as the KitchenAid. The whip attachment of the KitchenAid works much quicker than the Sunbeam, by far. The whisk attachment of the KitchenAid was my favorite new tool in the kitchen, this whisk attachment kicks some major butt. The 'Paddle' attachment of the KitchenAid does not come with the Sunbeam, & it was another favorite of mine. When making cookies, the KitchenAid 'Paddle' attachment is superior to the hooks of the Sunbeam. The 'Paddle' gets so close to the edges of the mixing bowl that when I cream the sugar & butter it comes out so light & fluffy; the Sunbeam does not even come close to the texture when creaming.

Does the Sunbeam work fine for the person only making pies for Thanksgiving every year, sure! It's lightweight, can be stored away without dreading having to pull it out of the cabinet or closet a couple of times each year. It will get most jobs done in a similar fashion to the KitchenAid. However, the KitchenAid whips, makes doughs, creams, gives beautiful texture to your baked goods in a way that the Sunbeam just can't.

Grab a KitchenAid during Black Friday deals if you can. They are usually about 30% off regular price. Mine has lasted 5 years so far & given me no issues, & I use it 4 or 5 times each week. With that thought, I don't ever want to move it around because it's so heavy in comparison.

That's my two cents on the Sunbeam vs the KitchenAid. Hope it helps!

Chicago Johnny
www.ChicagoJohnnys.com

Smoked Italian Beef Sandwich Recipe | Chicago Johnnys Italian Beef

Make Smoked Italian Beef At Home!

For those of you outside the Chicago area, or without ties to the Chicago area, Italian beef is a round roast sliced thin & seasoned with oregano, garlic, salt, & whatever other spices depending on where you get it. I use Chicago Johnny's Italian Beef Gravy Seasoning & Chicago Johnny's Italian Beef Rub when I make my beef sandwiches. 

But today, today we smoke an Italian beef!

Chicago Johnnys Smoked Italian Beef
Chicago Johnny's Smoked Italian Beef

What you will need:

• Smoker
• Applewood (I use fresh cut)
• Water (for the smoker)
• Charcoal
• Water (for the gravy)
• Round Roast (I use eye of round because I can find                 them in smaller sizes than top or bottom round)
• Chicago Johnny's Italian Beef Gravy Seasoning
• French Roll
• Chicago Johnny's Hot Giardiniera
• Smoked Provolone or Mozzarella (optional)


So I grew up using torpedo smokers (as shown from Amazon below) so that is what I decided to use as an adult. Set up your smoker with hot charcoal at the base & add in your smoking wood (you can use your preferred wood, mine is applewood!). For a torpedo smoker add your water pan & then your racks. 

To prep your roast is so friggin' easy! Just rub your roast with Chicago Johnny's Italian Beef Gravy Seasoning & let it sit to absorb some of the flavor for about 8-10 minutes. Then rub with another heavily layered rub of the beef gravy seasoning. You can now add it to the smoker!

On the top rack (there are 2 in my style of smoker) is where I put the roasts. I put the roasts on top because I feel like the smoke is more rich up there. You can put the roasts on the rack directly above the water pan if it is something you want tender & that won't dry out (so i use that mostly for jerky).

smoked beef roast
Smoking My Italian Beef Roast

Your roast will take about 3 hours to smoke if it's about 3 lbs. I bought a 5.5 lb eye of round roast & cut it in half leaving the thin layer of fat on the roast, face up. Keep a steady amount of smoke by adding more wood, or chips, when you see the smoke thin out (you will see the smoke billow out of the lid at first, then it will slow down as the wood burns down). 

When your roasts reach about 15-160 degrees, it's ready to pull out. Wrap it in foil & let it rest about 15 minutes (or chill overnight if you are using it later). Slice incredibly thin.

To reheat your sliced meat if you aren't using it right away, simply make gravy stovetop by adding 2 tbls of Chicago Johnny's Italian Beef Gravy Seasoning to 1 cup of water. Get your gravy to a low simmer & reheat your thinly sliced, smoked Italian beef!

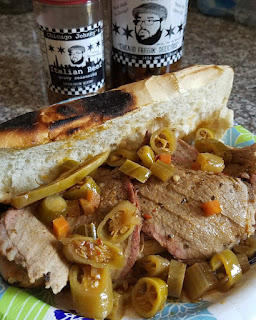
Make a sandwich on a toasted French roll, thin sliced beef, Chicago Johnny's Hot Giardiniera, & smoked provolone or mozzarella if you choose! Enjoy wit' some friends over a nice chilled Old Style.

Thank you to my smoking friends over at Old Style.

Order products at www.ChicagoJohnnys.com or from Amazon below.